SURFing The Charles
Earlier this month, I assembled some photos of the Charles River into a time lapse montage. It was a fun project even if it wasn't very novel. A while back a friend of mine suggested that I write more about the construction of these little projects. I figured I would give that a try with this last project. But here's the thing: I'm not really an expert at any of this stuff I tinker with. In fact, I'm not really an expert at anything. But I will try. Computer vision experts, please forgive me.
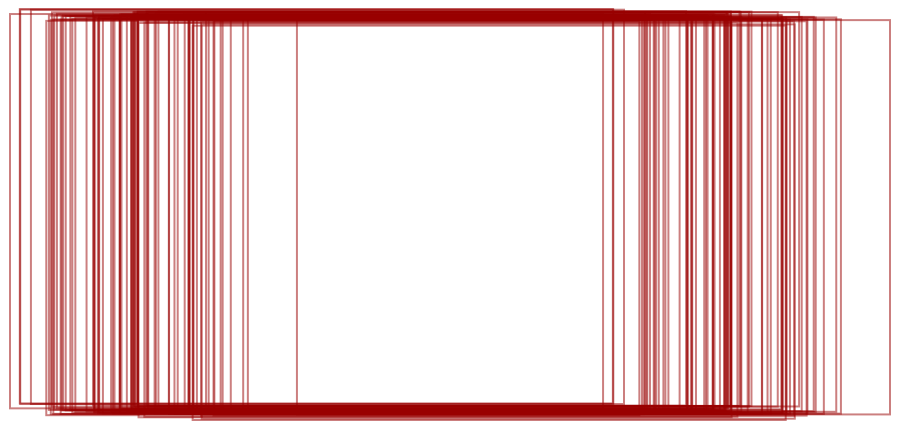
So as I said in that initial post, I recently discovered a whole DVD full of images of the Charles River taken over the course of a single day. When I found them I imagined taking a particular sequence of images where there is a great deal of change (i.e. sunrise) and assembling one composite image from vertical strips taken from each of the images. This has the benefit of, hopefully, keeping the scene recognizable but also orienting time from left-to-right, which is certainly the familiar orientation for English speakers. (I am told there is no intuitive natural mapping for right-to-left languages, but this is beyond both my knowledge and the scope of this post.) This would obviously be a pretty trivial task if all of those images had been taken from a stable vantage point but that wasn't really the case. The camera was, in fact, on a tripod, but the photographers were eyeballing the angle every few minutes when they took a series of photos from different angles. I hand selected about 80 morning images from roughly the same angle looking east toward Back Bay. While they were “roughly” the same angle, there was still a great bit of variation as you see in the map below of their final computed translations. The effect of the tripod is pretty apparent as their is much less vertical variation.
Finding those transformations
The transforms you see above represent the trickier part of the final product. We start with just a bunch of photos of equivalent size and we have to use the contents of those photos to figure out where the camera was pointing for each. Well, ok, to be honest, we just need to know how the camera changed from each photo to the next. If we can figure that out, we can simply move (transform) each image as if they were all taken from a stable position. This is not a unique problem. If you have ever seen those fancy programs that will take a bunch of photos and make a panorama for you, this is essentially the same problem (see Image Stitching). There is some interesting theory behind all of this, but as I said, I'm no expert in computer vision. Instead, I'm going to keep this practical and avoid much discussion of the theory. Instead, we'll just go through this step-by-step.
1. Finding features
If you were to align all of these photos by hand, you might focus on particular features in the image and just move the images until those prominent features align properly. A good feature to look at is the Prudential Tower. If I were wise, I would have simply hand aligned all of these images using that one building as the guide.But that's not really any fun. I was also trying a lot of different things as I tend to do with these projects so I would have lost the ability to experiment with other views quickly.
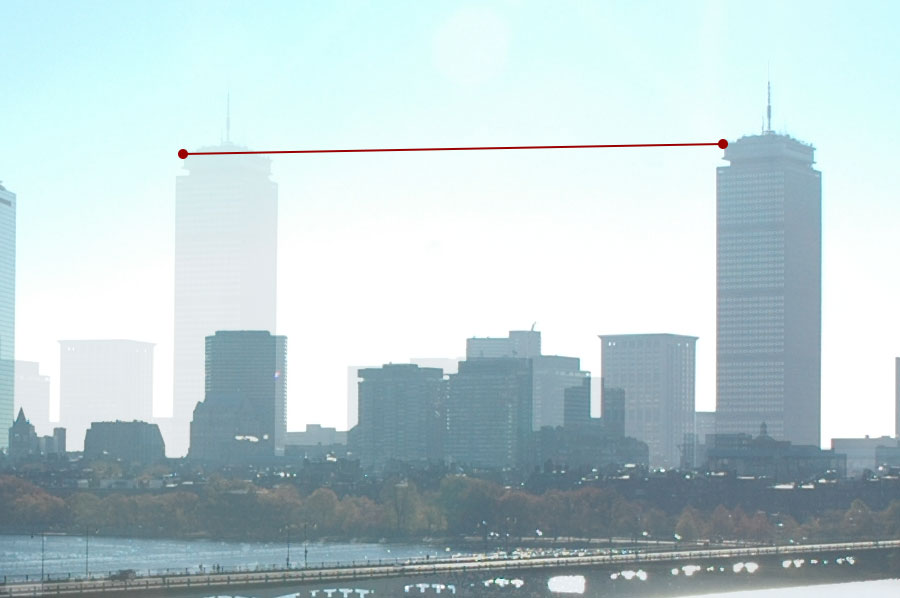 I could have aligned each pair of images by hand, using the Prudential Tower.
Computers, as you are probably aware, have a harder time recognizing buildings. But there are other techniques for finding memorable features in images. In fact, there are enough techniques to warrant a table in Wikipedia. Beyond just finding interesting points in an image, though, we also need to be able to describe that interesting point with enough detail that we can find it in a second image. Seeing where a feature moves from one image to the next is the whole basis for this stuff. This interesting point with an accompanying description is commonly called a feature descriptor. This consists of a point of interest and a “feature vector” which describes the feature in a way that we can compare it to other features to determine if it looks similar. There are really two such feature descriptors that are pretty popular today and easily accessible: Scale Invariant Feature Transform (SIFT) and Speeded Up Robust Features (SURF) . These two are quite similar in nature and both have the property that the feature descriptors are immune to some transformation. In other words, they still match pretty well when you move the camera a good bit. I used SURF for this project, but I could have just as easily used SIFT (or another descriptor). There are some tradeoffs, but they are certainly beyond the scope of this post. To give you a sense of what a computer finds interesting in a photo, here are the features from one of the photos in the sunrise sequence.
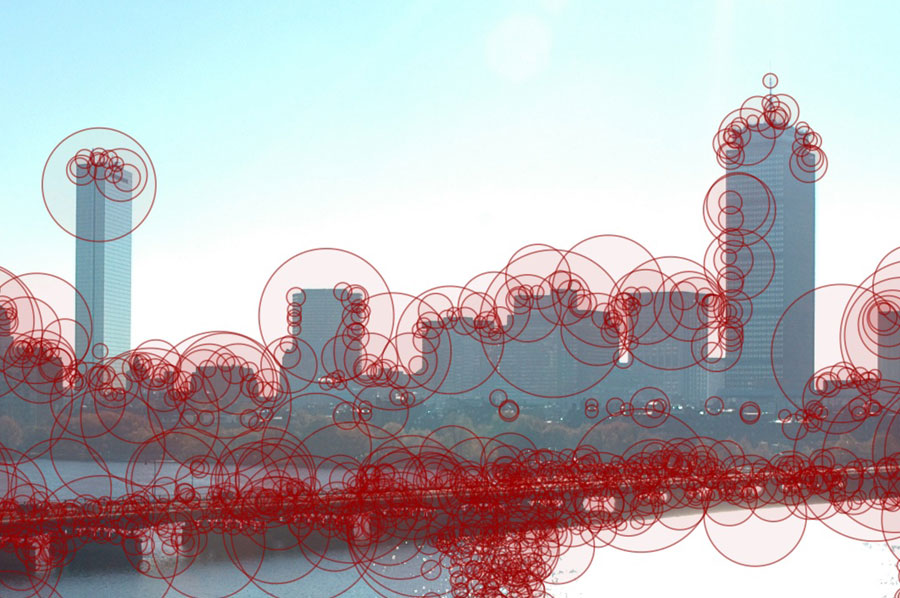 SURF features in the 8:37AM photo slice
If you are using OpenCV, all of this is built in and you can use code similar to what is shown below. If you want a guide that attempts to bridge the gap between theory and code, I recommend Programming Computer Vision with Python.
2. Matching features
Moving onto the next step in this adventure. We have a set of descriptors for each image. Now it's time to find those same descriptors in other images. In my case, I'm most concerned that adjacent images align properly. For other problems, it is common to match all other images to a single reference image. But I need only match the features from one image to the one that will appear to its right. The nature of these feature descriptors (aka feature vectors) is that it is pretty easy to determine the similarity of any two. So a slow way of matching features is to take each feature in one image and look for the most similar feature in the other image. If those two features are within a distance threshold, then you have yourself a match. There are, however, much faster ways of doing this that rely on well used indexing techniques. One method that works pretty well is FLANN (Fast Approximate Nearest Neighbor Search). Like SIFT and SURF, this also has the advantage of readily available in OpenCV. Using this method, we'll get back a list of matches containing pairs of features, one from the first image and the other from the second. So for each feature, we now know how far and in what direction it moved. Again, using OpenCV, the code is straight foward.
And here are some of the matches for a pair of images in the sunrise sequence.
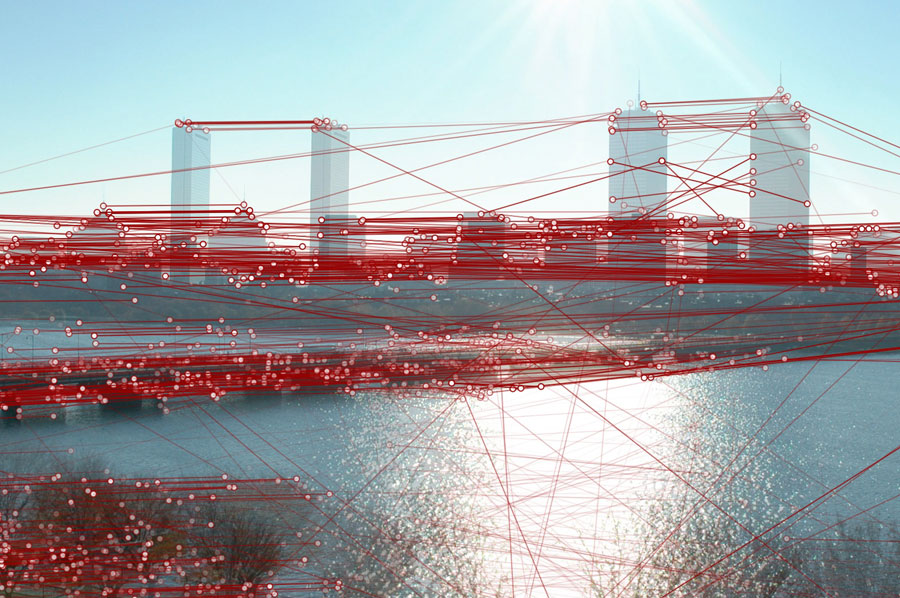 Matches found between the 8:01AM and 8:21AM slices
You will notice that many of the matches are absurdly wrong. A great many more, though, are correct. When we look for a proper transform next, we'll have to take care to use strategies that minimize the effects of these outliers.
3. Finding a transform
Generally when you arrive at this step, we assume that the camera will have moved with absolute freedom. The photographer may have rotated, or moved to the side, or taken a few steps back. So in general we are looking for a transformation matrix that will correct for all of these camera movements. In fancy terms, we say these two images are related by a homography which we can find with some math (generally using RANSAC) and then use the resulting matrix to transform one image into the coordinate space of the other image. That's fancy and perfectly tractable, but I was looking for something a bit simpler. First, I could tell that most of my images were primarily affected by translation. There wasn't a lot of rotation or scale change, they had simply moved left or right. There is a bit of rotation, of course, because this camera was atop a tripod. But accuracy was not the primary goal of this project. I did not want to deform the images with 3D transforms. I really wanted the strips to be more of a gallery for the original photos which makes my job a lot easier. I simply need to find the translation of each image relative to the image to its left. I could have certainly gone ahead and computed the homography and then extracted the translation from there, but why bother? I do something far sillier; I compute the median translation between each image. The fact that gross outliers exist, by the way, is why I prefer median over mean. So now I have for each image the distance it needs to be moved in both the x and y directions. This is what you see in the figure with all the rectangles shown above, each image's bounding box relative to the other images. So now the tricky part is done, nothing to do but paint some pixels.
Wrapping it all up
With these projects, there is always a long tail of finishing touches. I obviously built a little web app for displaying the images and their associated time. I also had a few other touches to deal with. The first is that it can be tricky to find strips on the right side of the image. If images later in the sequence are translated too far to the left, we'll end up with an empty strip. To fix this, I did the dumbest thing that worked. If an image is too far to the left to produce a good vertical strip, I discard it and rebuild the strips as if it wasn't there. Keep in mind, I don't have to find the transforms for the new images since I already have global transforms for each image. The next issue is a purely aesthetic one. There is the issue of that one image where the sun makes its debut over Back Bay. As you might expect, it didn't just work out naturally so that strip aligns just right to show off the sun in the composite image. Nope, I cheated like hell by translating the whole image to the left until I had the sun showing. I even had to discard some images from the right to make sure it all worked out. That translation was a pretty manual process with several code tweaks, so I did not include it in the code I put up on Github.
The Source Code
As with most of my little projects, I've released the associated code on Github. With the exception of the feature descriptors, most of this code is somewhat straightforward to write by hand (it's a little trickier if you want it to be super efficient). Fortunately, though, OpenCV has an excellent collection of everything I've described. It even has bindings for Python if you aren't into C++. For this project, I had originally written some parts by hand before realizing I didn't have to and moving everything to OpenCV. If you are not on OSX, I have to apologize as the graphics code uses CoreGraphics which will prevent it from compiling on anything but a Mac. It would be fairly simple to do the same thing using Cairo or Skia.
And that's about it. A DVD full of images, some hand curation, some OpenCV code and I was able to stitch them together into a little time-lapse panorama without knowing much at all about computer vision.